6.2. Avtec Scout RTP Forwarding
License Required
This feature must be licensed to be used. Contact your Eventide Communications Dealer for assistance.
The virtual AVTEC recording interface on the NexLog recorder utilizes one “Local VoIP/RTP channel” license for each channel allocated.
To check the number of licenses on the NexLog recorder, open the Configuration Manager and navigate to System -> License Keys on the left side. The licensed quantity will be listed on the right side under an “Addon” key. Look for the text “Num Local VOIP/RTP Channels = XX” where XX is the number of channels the NexLog is license for. License Allocation 1 Scout™ Console Select output = 1 license 1 Scout™ Console Unselect output = 1 license 1 VPGate™ radio output (Tx and Rx) = 1 license
Metadata Capture To capture the received metadata from the AVTEC sources, the Eventide NexLog will need to have an available metadata feed license.
One metadata feed license is required for each “Virtual Recording Interface”
The licensed quantity will be listed on the right side under an “Addon” key. Look for the text “Num Metadata Data Feeds = XX” where XX is the number of metadata feeds the NexLog is license for.
Licensing Example This example shows the licenses required to capture AVTEC audio on a single NexLog recorder with 1 IP address on a single Virtual Recording Interface.
- Radio Recording Requirements:
5 - Scout Consoles, each one recording the “Select” audio feed, with metadata enabled
15 - VPGate Endpoints, each one recording transmit (Tx) and receive (Rx), with metadata enabled
- Eventide NexLog Requirements:
20 - Local VOIP/RTP Channels
1 - Metadata Data feeds
6.2.1. AVTEC Scout™ Console Configuration
AVTEC Scout™ consoles may be configured to perform IP-based Audio Forwarding of Select and/or Unselect audio to the Eventide NexLog. Important! Any AVTEC system configuration instructions herein are provided for convenience. For definitive instructions on how to configure audio forwarding for Scout consoles, always refer to the latest AVTEC documentation.
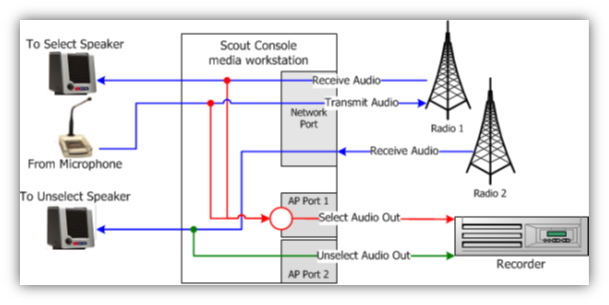
Fig. 6.42 Scout IP Audio Forwarding
The diagram in Figure 2 (from the AVTEC “Logging Recorder Compatibility Guide”) shows Scout™ Console IP audio and metadata being sent from the audio streams, through the ethernet port, over the network to the NexLog recorder. If E911 (NENA-compliant) audio is included in the Select audio, it is included in the recording.
6.2.1.1. Select Channel Audio Forwarding
The Scout™ Console Media Workstation (SCMW) may be configured to forward “Select Channel” audio packets to a single recorder’s IP address and UDP port. The SCMW can be configured to mix the Select receive audio and microphone audio into one stream before forwarding to the Eventide NexLog’s IP address. The following steps need to be performed for each Console where Select audio is to be recorded:
Login to the SCMW configuration manager with an Administrative account
Add a new Network Audio Device
Enter a name for future identification
Enter the IP address of the Eventide NexLog
Enter the UDP Port number that will be assigned to record the particular Console’s Select audio. Be sure to note this port number as it will be used for configuration on the NexLog recorder.
Select G.711 for the VoIP Audio Codec
Enable the microphone is you wish to capture the dispatcher’s transmissions
Enable Send Metadata if desired
Select “Update” at the top of the page to enable to new device
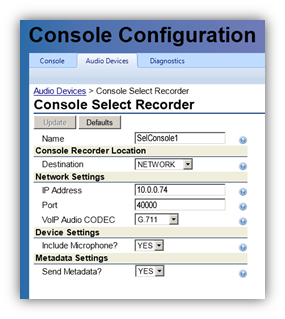
Fig. 6.43 SCMW Select
6.2.1.2. Unselect Channel Audio Forwarding
The Scout™ Console Media Workstation (SCMW) may be configured to forward “Unselect Channel” audio packets to a single recorder’s IP address and UDP port.
The SCMW mixes all Unselected audio the console received into one stream before forwarding to the Eventide NexLog’s IP address. The following steps for each Console for which Select audio is to be recorded:
Login to the SCMW configuration manager with an Administrative account
Add a new Network Audio Device
Enter a name for future identification
Enter the IP address of the Eventide NexLog
Enter the UDP Port number that will be assigned to record the particular Console’s Unselect audio. Be sure to note this port number as it will be used for configuration on the NexLog recorder.
Select G.711 for the VoIP Audio Codec
Enable Send Metadata if desired
Select “Update” at the top of the page to enable to new device
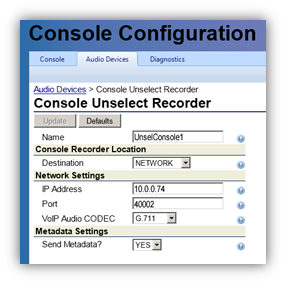
Fig. 6.44 SCMW Unselect
6.2.1.3. AVTEC VPGate™ Configuration
Audio to and from conventional radios or other Outpost™-connected circuits, P25 DFSI or CSSI endpoints, or non-Avtec endpoints (such as NXU2A network extension units) may be recorded via automatic audio forwarding from the AVTEC VPGate™ to the Eventide NexLog. Two UDP ports are used for audio forwarding (one UDP port for audio to the endpoint, and one UDP port for audio from the endpoint). The Eventide NexLog receives the forwarded IP-audio on the two UDP ports, mixes the two streams, and records the endpoint’s audio on one voice logging channel.
In the case of IMBE/AMBE encoded audio, the VPGate™ transcodes to G.711 before forwarding to the Eventide voice logger.
Important
Any AVTEC system configuration instructions herein are provided for convenience. For definitive instructions on how to configure audio forwarding for Scout consoles, always refer to the latest AVTEC documentation.
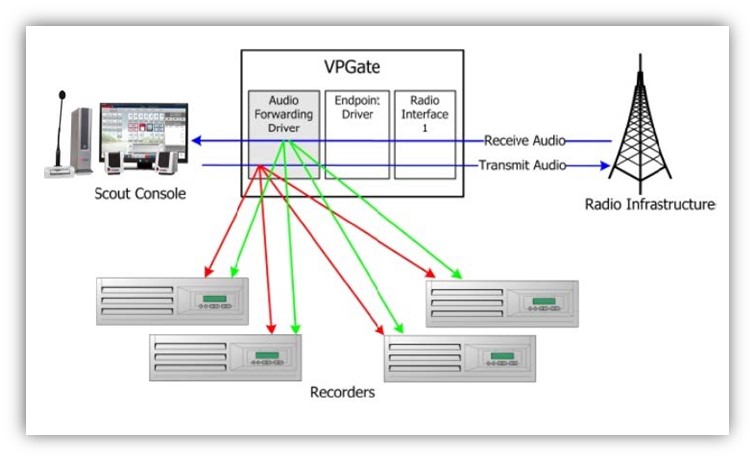
Fig. 6.45 VPGate IP Audio Forwarding
The diagram in Figure 5 (from the AVTEC “Logging Recorder Compatibility Guide”) shows VPGate™ Endpoint IP audio and metadata being sent from the audio streams, through the ethernet port, over the network to the NexLog recorder.
6.2.1.4. Endpoint Audio Forwarding
VPGate™ performs separate audio forwarding for audio that is transmitted toward the endpoint and for audio that is received from the endpoint. Thus, audio to/from a single endpoint will be forwarded to two UDP ports on the Eventide NexLog. The Eventide NexLog is normally configured to mix the audio streams from the two UDP ports of a VPGate™ Endpoint so that both are recorded to a single channel on the logger. AVTEC VPGate™ can be configured to perform IP-based Audio Forwarding of endpoint audio to up to 4 Eventide NexLogs simultaneously. To forward endpoint audio to the Eventide voice logger, an audio forwarding driver must be configured for the desired endpoint.
The following steps need to be performed for each endpoint where audio is to be recorded. This process describes enabling the capture of transmit and receive audio:
Login to the Scout Project Manager with an Administrative account
Select the Endpoint to be recorded
In the “Drivers” section at the bottom of the page, select “Audio Forwarding” and Select “Add driver”
Under Metadata Settings, enable Send Metadata if desired
Audio Transmitted Toward the Endpoint:
Enter the IP address of the Eventide NexLog in the field labeled “IP Address #1”
In the corresponding UDP port field, enter the UDP Port number that will be assigned to record the particular Endpoint’s transmit audio. Be sure to note this port number as it will be used for configuration on the NexLog recorder.
Audio Received From the Endpoint:
Enter the IP address of the Eventide NexLog in the field labeled “IP Address #1”
In the corresponding UDP port field, enter the UDP Port number that will be assigned to record the particular Endpoint’s receive audio. This port should not be the same as the transmit UDP port. Be sure to note this port number as it will be used for configuration on the NexLog recorder.
Select “Update” at the top of the page to enable to new driver
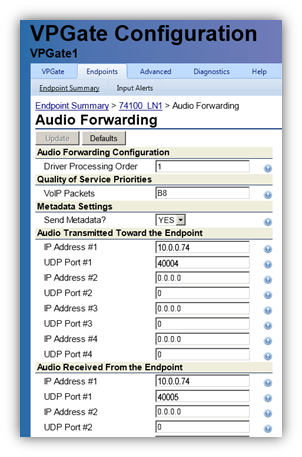
Fig. 6.46 Endpoint
6.2.1.5. Eventide NexLog™ Configuration
The Eventide NexLog receives the UDP audio packets from the VPGate™ and Scout™ Consoles and captures them on the assigned logging channels.
Before beginning the setup process, ensure that the AVTEC systems are able to pass traffic to the recorder’s assigned IP address. This is particularly important when a firewall is configured between the NexLog and AVTEC network.
6.2.1.6. Virtual Recording Interface Setup
Once licensing is verified and the AVTEC components have been configured, you can begin the setup process to capture your AVTEC audio and metadata.
Open the Eventide NexLog Configuration Manager’s web page.
Login with an Administrative account.
Use the navigation on the left and go to Recording -> Boards.
At the bottom of the page, select “Add Virtual Recording Interface”.
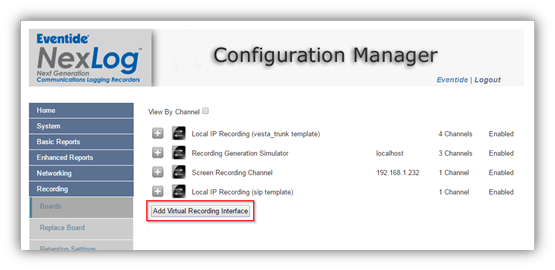
Fig. 6.47 Add Virtual Recording Interface
Select the number of channels desired using the “Channel Count” field.
In the “Local IP” field, select “Avtec Scout™ RTP Forwarding”.
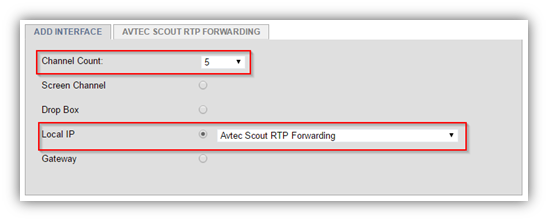
Fig. 6.48 Configure Virtual Interface
In the “Base RTP Port” field, enter the starting range of your configured RTP ports. The default value is 40000.
Update the Tx and Rx Ports to reflect the values configured in the SCMW and VPGate™. Scout™ Console Select and Unselect recording only requires the use of one UDP port. Enter that port number in the Tx field and leave the Rx field empty.
Click the “Metadata” checkbox if metadata is expected to be received on the channel.
Select “Save” when finished.
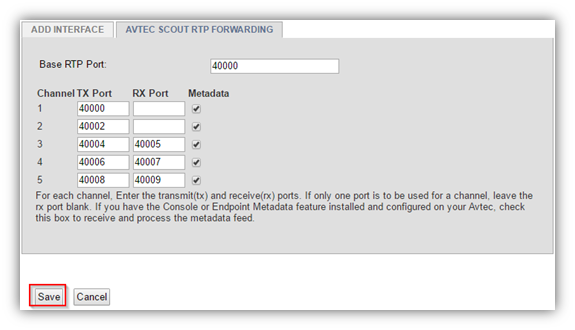
Fig. 6.49 Configure UDP Ports and Metadata
Expand the new Virtual Recording Interface.
Click on the new channel’s name to update it. Select “Enter” to save it.
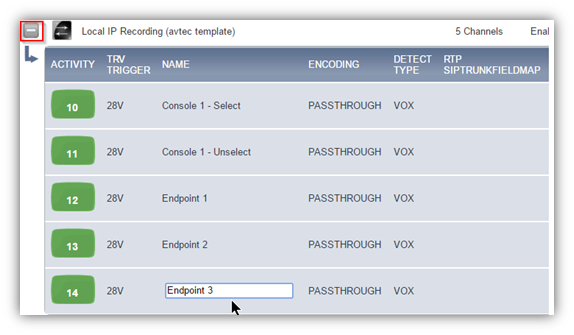
Fig. 6.50 Update Channel Names