7.5.2. Archive Configuration
This section has the same basic display as “Archiving: Archives” but has different control buttons:
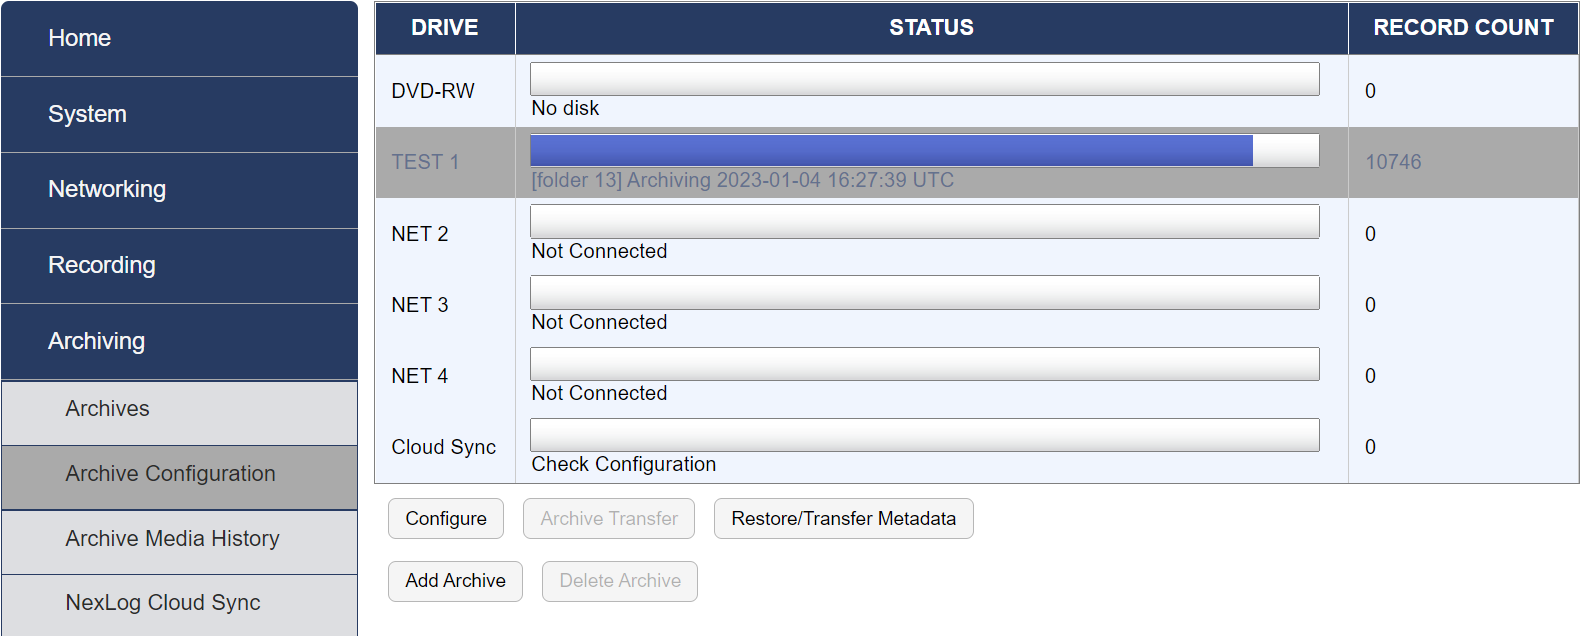
Fig. 7.84 Archive Configuration
- Add Archive
Archive drives that connect to the recorder via networking must first be added to the recorder so that they show up as selectable drives on the Setup Archives page. Once added, they can then be configured using the ‘Configure’ button. As will all archive drives, the recorder must also have the correct license keys installed to be able to access the archive drives. After clicking this button, you must select which type of addable archive drive to add to the system. The options are NAS (Network Attached Storage, Windows SMB), NFS (Network File System, also known as ‘Network Shares’), or Centralized Archive, which is another NexLog DX-Series recorder which will be acting as an archive device for the current recorder. You will be able to configure archive parameters specific to the NAS, NFS or Centralized Archive here, these options are identical to the ones provided under ‘Configure Archive’ for the archive drive and will be described below.
NexLog DX-Series Recorders can be configured with one NAS or NFS archive, total, for free; configuring more than one requires an additional add-on license.
- Delete Archive
Archive drives that have been previously added can be deleted via this button. Physical drives can not be deleted, only ejected.
- Archive Transfer
If you insert previously-recorded archive media into a drive, this button can be used to perform a restore operation, i.e., copy the calls from that medium back to RAID. Several checks are performed before transferring the data:
Does the serial number of the recorder that recorded the archive medium agree with that of the destination recorder?
Are the channel names of the recorder the same as the destination?
Does the format of the data on the archive conform to that of the destination?
Is there any problem with or damage to the archive medium to be transferred?
Are all (or some) of these calls duplicates of calls already on the recorder?
If none of these are appropriate for the medium, or if you indicated that you wish to proceed, the archive transfer will commence. All drives operate independently. You can restore archive media in all available drives, or you can even record archives on one medium while restoring from another.
Important
The restoration process cannot continue once the RAID is full, so unless you have a special reason for doing otherwise, always restore from the most recent archive backwards.
If you are restoring archives after a new installation, use the Set Archive Time facility to make sure that new archives are only recorded from the present forward. If you don’t set this and begin new archiving after you have restored your archives from a previous installation, you might find yourself “re-archiving” the restored archives.
- Restore/Transfer Metadata
Metadata archives contain just the metadata for calls on a system; this is a way to archive any notes, annotations, etc, that are applied after a recording is made. In the case of a system failure, restoring from an archive made at recording time will be missing any metadata added afterwards; restoring metadata will update the metadata on these calls to include what was present at the time metadata was archived. To create metadata archives, use the Backup User Edited Metadata feature of Schedules, discussed below under Utilities.
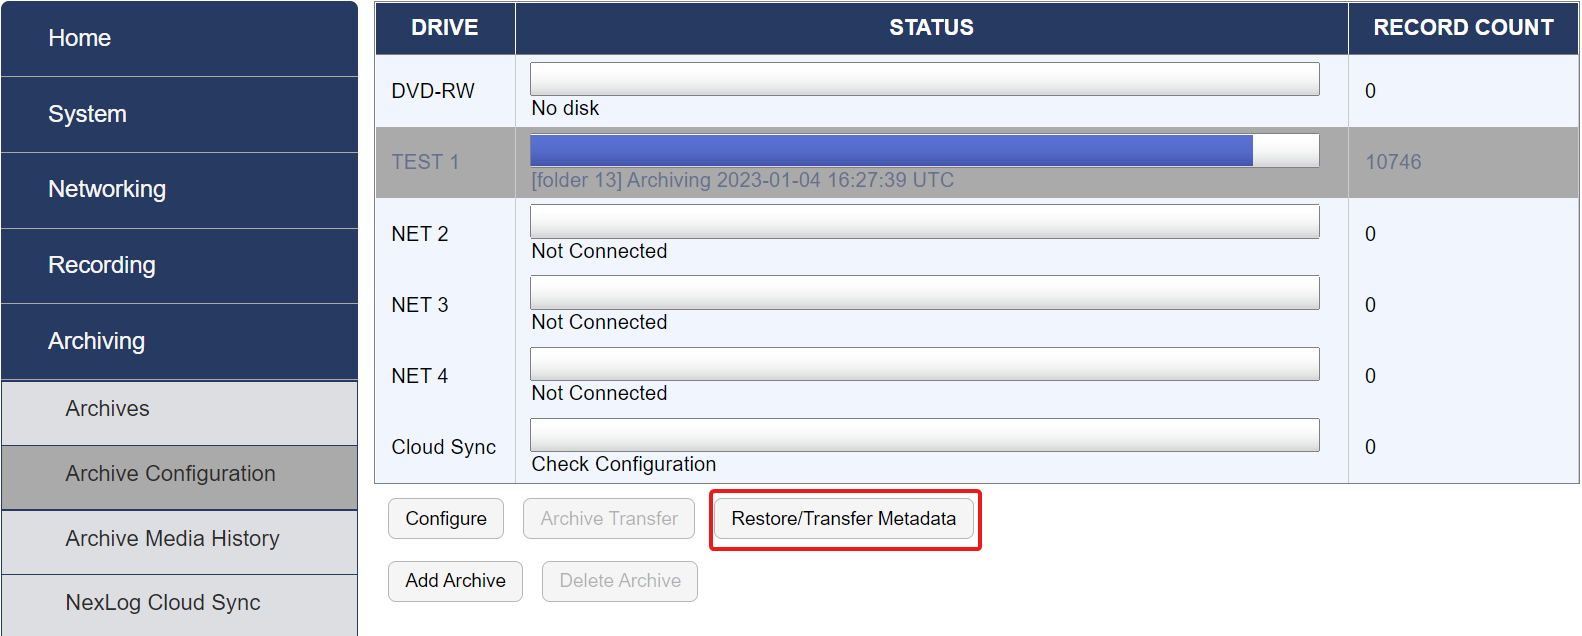
Fig. 7.85 Restore/Transfer Metadata
- Configure
This screen allows you to configure your archiving drive. Once you’ve selected a specific archive on the Archive Configuration page, click “Configure” to access Settings, Time, Groups, Tracking, and NAS options.
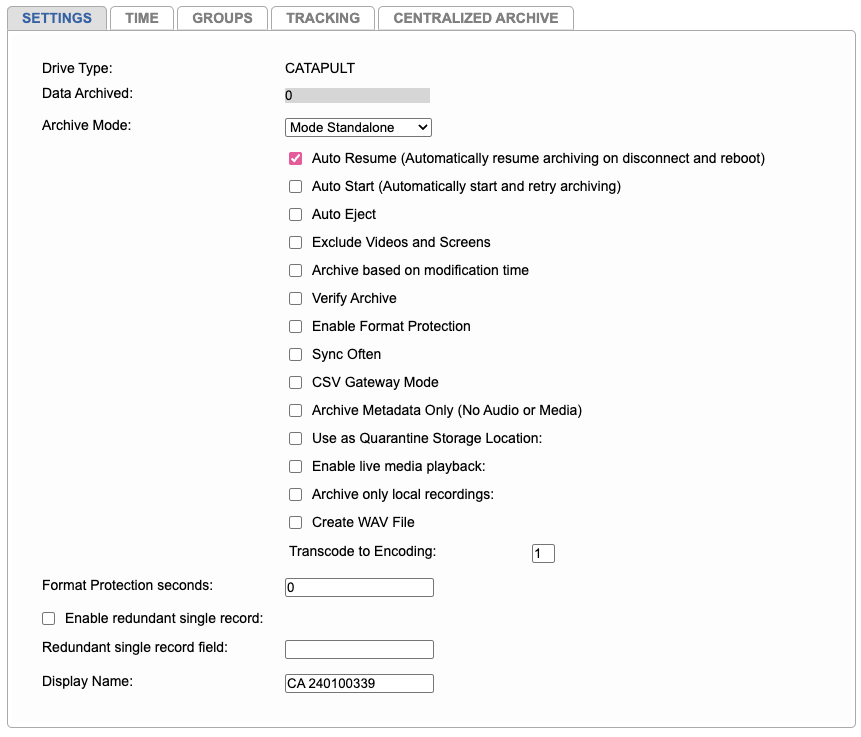
Fig. 7.86 Archive Display in Configuration Manager
7.5.2.1. Settings
- Drive Type
The type of drive.
- Data Archived
The amount of data archived since install. This number is in Bytes.
- Archive Modes
- Sequential
(Default) In this mode, archiving will automatically move on to the next available medium when current drive in use is full, continuing on to each available drive in order from top to bottom. This method also supports double sided disks and will continue in a similar manner once all drives have been used, returning back to the top to continue archiving on side B. (requires manually flipping the disk)
- Parallel
In this mode, archiving will record to all available drives simultaneously capturing the same data, providing redundancy.
- Standalone
Drive acts independently, writing on entire drive then stopping. This is the default setting for USB and network drives.
- Period
When selected, blank drive will write specific time range to archive. This is triggered by selecting “Period Archiving” from Archive page.
- Auto Resume
When enabled, a recorder that is turned off while archiving will resume archiving from the same spot once the recorder is restarted. This setting also applies to Network Archives after a network disconnect.
- Auto Start
When enabled, archiving will begin automatically whenever the drive is in a state where archiving is available. Auto start will not archive when there is no media, media is full or damamged, a drive is in browse mode, or when another drive is currently archiving.
Note
It may be necessary to disable Auto Start option to eject or browse a drive while partially full.
- Auto Eject
Ejects the media after it’s full. This is only applicable for Blu-Ray drives.
- Exclude Screens and Videos
This will exclude archiving of all screen and video recordings.
- Archive Based on Modification Time
Use this setting to make sure that any metadata changes to archived calls will also get archived. When enabled, the field “Modified Time” is added to the recorder and appears in MediaWorks DX. The “Modified Time” field is updated whenever a call’s metadata is altered, such as when a note is added to an already recorded call.

Fig. 7.87 Modified Time Field in MediaWorks DX
Note
This setting assigns modified time values only to calls that are recorded or modified after the setting is enabled in the Configuration Manager. Only these calls will be eligible for archiving.
For example, if Call A was recorded before this setting was enabled and has not had any metadata changes, it would not be archived. However, if Call B was also recorded before this setting was enabled but had metadata changes after the setting was enabled, the call would be archived.
When using period archiving or the “Set Archive Time” configuration option, calls with a modified time within that period will get archived even if their start times fall outside the set time range. In other words, the modified time of a recording takes precedence over its start time when archiving based on modification time.
- Verify Archive
When using optical media, filesystem check will run after finishing a write operation.
- Enable Format Protection
Protects the media from being accidentally formatted until the time on the recorder is greater than the oldest call on the media plus the configured protection seconds. Note that this option only prevents you from formatting the media on the NexLog DX-Series recorder, it does not protect against placing the media in a PC and formatting it there.
- Sync Often
When enabled, writes out data regularly in order to reduce length of time needed to archive to prevent writing delays on shutdown.
- CSV Gateway Mode
Saves data to PC which includes call info in a CSV file.
- Archive Metadata Only (No Audio or Media)
This option allows you to archive only the recording and metadata databases. This option would typically be used in a multi-recorder environment (using Enhanced Reports) to allow reports to be ran from a single server.
- Use as Quarantine Storage Location
Enables user to use archive drive as impound/quarantine location for dedicated set of file playback.
This requires MediaWorks DX ATC/ATM license
- Archive only local recordings
When enabled, the recorder will only archive calls that were originally recorded on it.
- Create WAV File
This option will include an 8-bit, 8.0khz WAV file of each call, playable directly from the disc in any computer able to read the archive media. This will of course reduce the number of calls that fit on a given disc as it consumes more space than just the native encoding.
- Transcode to Encoding
When “Create WAV File” is enabled, The output format is determined by the encoding setting; 0 - raw pcm 1 - mu-law
- Format Protection seconds
Works in conjunction with “Enable Format Protection” to add additional buffer time before formatting.
- Display Name
Changes the Name of the Archive being configured.
7.5.2.2. Time
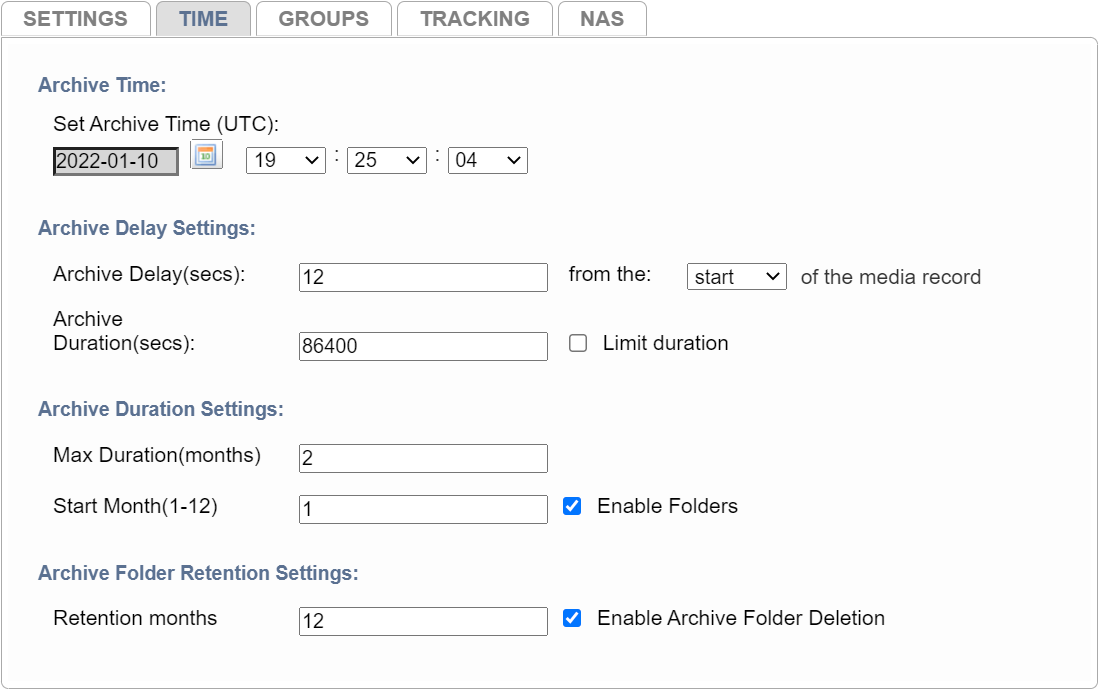
Fig. 7.88 Time Configuration
- Set Archive Time
Allows you to set the current archive pointer.
When you start archiving, the first call to be archived is determined by an internal archive pointer. This pointer tracks where you left off archiving with the previous disk so that the next disk will begin where the previous one left off. Also, if you are in the middle of a disk and you stop archiving, for whatever reason, such as the need to browse calls on the disk, you can resume archiving at the point where you left off. The goal is to ensure that only consecutive calls are recorded on each disk, making labeling and searching easier. This pointer is maintained automatically.
However, there are times when you may want to manually set the current pointer location. For example, you may have misplaced an archive disk and you want to re-archive calls. Of course, to do so the calls must still be present on the RAID.
To manually set the current archive time, select a date and time using the calendar control and save the form. The next time you start archiving, the calls on your RAID closest to the new archive time setting will be archived first.
When you have completed recording a medium whose starting time you have selected with the Set Archive Time feature, the time pointer is set to the time of the end of the medium just recorded. It is NOT set to the end of other data that may have been archived. Sometimes this is desired behavior, such as when you want to record more data than what’s able to fit on a single medium from the starting time you set. Sometimes it may not be, such as when you want to continue archiving from the end of the last medium you recorded in the normal sequence. If the second is your requirement, you can note the desired time and reset the archive pointer to this time. If you failed to make a note, you can take the most recent archive medium, read the “Media info” for that disk, and set the pointer to that time.
Important
As noted in the display, the Archive time is set in UTC time. If you are setting the archive time to start at the end of a previously recorded archive medium, you will probably use the “Media Info” feature to check on the end time of that medium. The recorder displays “Media Info” in UTC since the archives are portable and must be compatible over time zones and different playback hardware. To dovetail the recorded and new archive times, you must convert your local time to UTC for this setting.
- Archive Delay
How long (in seconds) to archive behind the recorder’s current time.
- Archive Duration
- Max Duration (months)
When enabled, this setting dictates how many months will be saved to each folder.
- Start Month (1-12)
Which month you choose to start archiving with (1=Jan, 2=Feb, etc)
Example: If a user wants to set up a library of archives for each year, they would set the start month to 1 and the max duration to 12. In this manner, an archive started in March would run for the rest of the year and start a new archive folder in Jan.
- Archive Folder Retention
When retention is enabled, NexLog DX-Series will automatically archive and maintain the amount of months selected while overwriting the oldest information.
Note
The main purpose of this feature is to have an uninterrupted archiving process with a fixed timeline in order easily maintain the standards of your company’s file retention policy and protocol.
7.5.2.3. Groups
Groups allow you to set up archiving for specific channels or a collection of channels called “Groups”
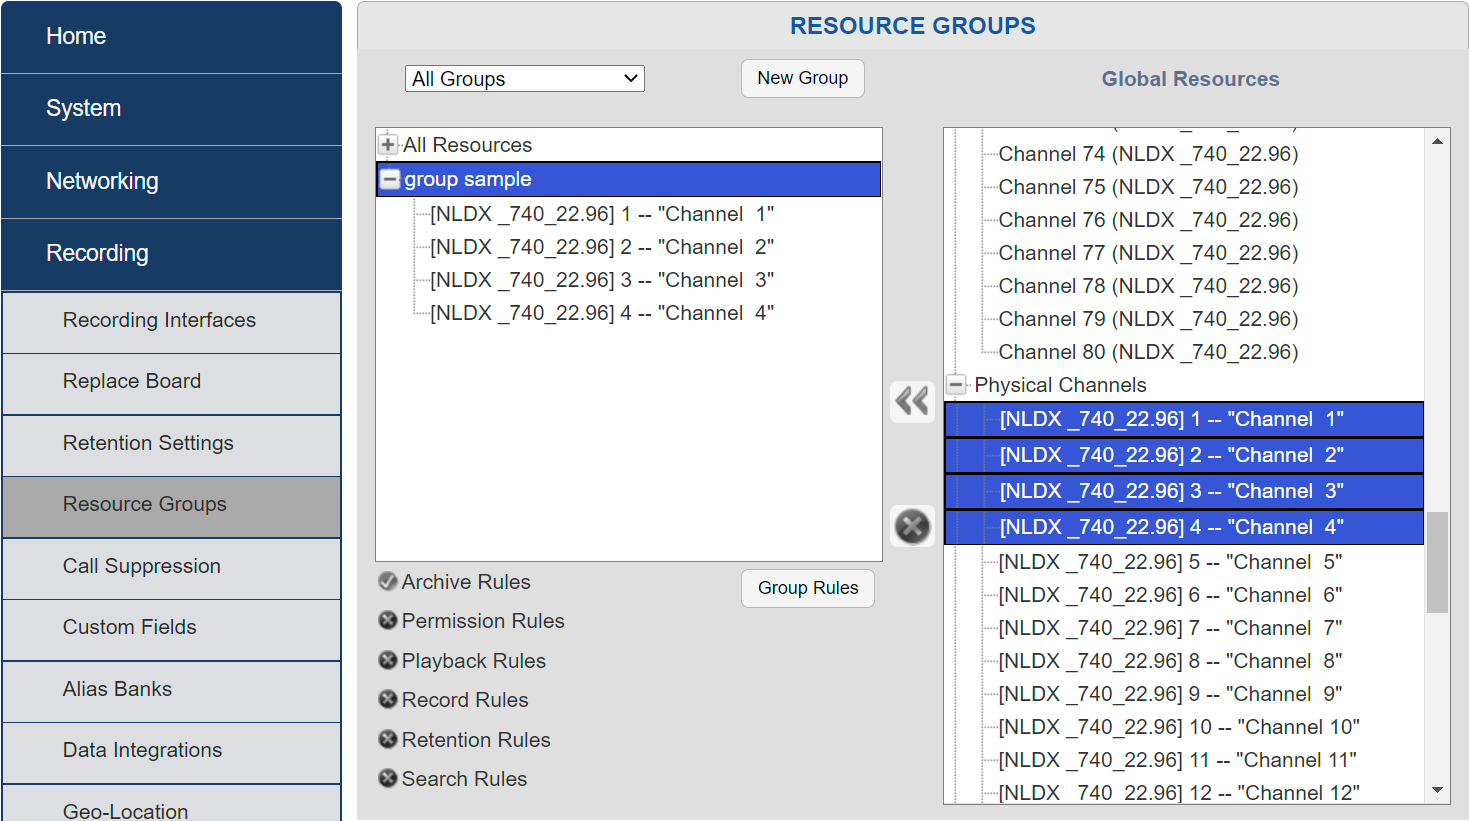
Fig. 7.89 New Channel Group
In order to create a Channel Group, you’ll first need to make a new Group in the “Recording/Resource Groups” section. Start by creating a “New Group”, then choose the channels from the Global resources on the right that you wish to archive, and drag/drop them into the new group.
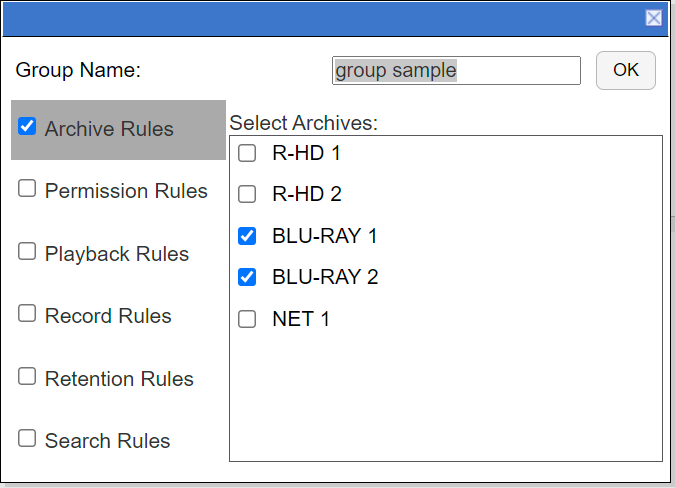
Fig. 7.90 New Group Rules
Once you have all selected channels in your group, you will select “Group Rules” to name your Channel Group, choose the drives you’d like to archive to, and enable “Archive Rules”.
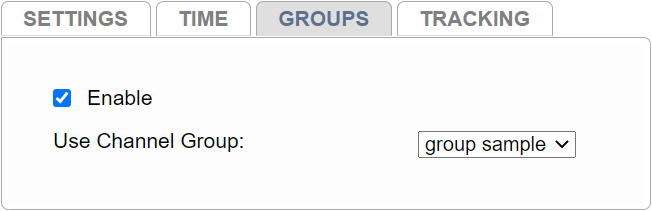
Fig. 7.91 Use Channel Group
Next, simply navigate back to “Archive Configuration”, choose a drive to configure, and select the “Groups” tab to enable this feature and select the Channel Group that you’d like to archive.
7.5.2.4. Tracking
Fig. 7.92 Tracking Configuration
Tracking is an option that prevents calls from being left out of archives. Because of the inherent nature of the technology involved, recorders do not always receive calls from VoIP, Screen Capture and Centralized Archiving sources in real-time. They can, under certain conditions, end up receiving calls hours or even days after they were originally recorded. This can have a significant impact on archiving.
Take the following scenario for example:
A busy NexLog DX-Series Recorder with both local input board sources and screen channels.
The archive pointer on a Blu-ray drive is set to current time.
Calls are currently coming in on the local input channels.
Due to temporary but severe network congestion, a screen capture client has buffered an hour’s worth of calls, which is just now transferring to the NexLog DX-Series Recorder.
In the above scenario, archiving calls to this Blu-ray drive would leave the hour of screen calls unarchived. To avoid this, use Enable wait for remote data function to prevent archive from writing until the screen system is fully synced and ready to archive in full.
Note
This feature is optional to accomodate continued archiving when a Call Source is temporarily offline. In this case, turn off option, create the archive you need, then enable and reset the archive time.
7.5.2.5. Network Archive Storage (NAS) Configuration
The recorder can not only archive its own internal drives and removable media, but it’s also able to archive using a standard Microsoft Windows Network Attached Storage (NAS).
Using more than one NAS on a recorder requires an Add-On License
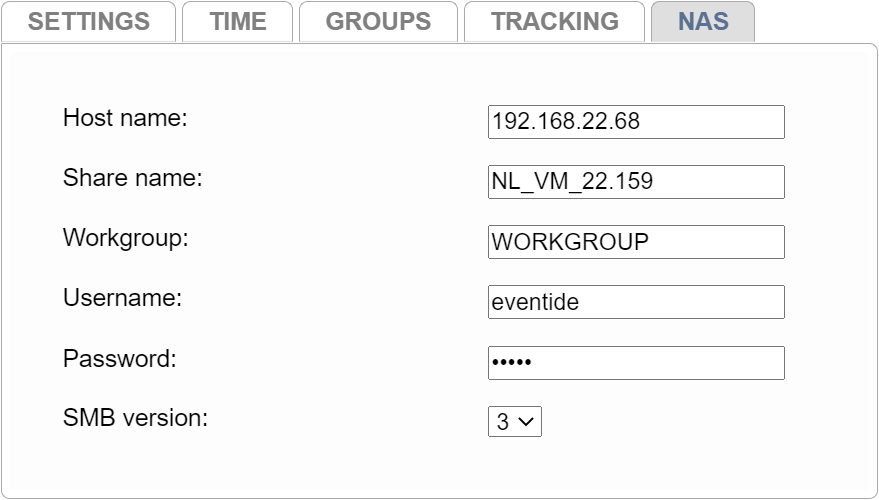
Fig. 7.93 Adding a NAS (Windows SMB) Network Archive
- Hostname
The NETBIOS or DNS name of the server where the archives will be stored. This server must be a Microsoft Windows server or other system that emulates Microsoft Windows file sharing.
- Share Name
The name of the share on the server where the archives will be stored. Microsoft Windows syntax for specifying a network location is:
\\Hostname\SharenameFor example, if your network administrator has specified that the recorder archives can be stored at
\\BigServer\RecorderArchivesThe NAS Hostname should be configured as
BigServerand the Share Name should be configured asRecorderArchives.- Workgroup
The Workgroup or Domain of the server where archives will be stored.
- Username
A valid username that has been granted read/write access to the hostname and share name where the archives will be stored.
- Password
The Password associated with the Username on the Microsoft Windows server.
- SMB version
Option to set SMB based on your network settings.
Note
For more details on NAS storage and Incident Evaluation Sharing/Restoring, see Appendix E Incident Evaluation Restore
7.5.2.6. Centralized Archive Configuration
Centralized Archiving (CA) allows you to set up an archive drive that directs calls from one NexLog DX-Series recorder to another.
There are three main uses for Centralized Archiving:
Central Pooling: Combine calls from multiple recorders into a single “central” recorder, allowing all recordings to be accessed in one place. Typically, these are then archived to a NAS drive, consolidating recordings from all site recorders.
Redundancy: Ensure continuity by linking all site recorders to each other. If one recorder fails, others retain all calls up to that point. Each recorder can also archive to its own NAS, enhancing redundancy and access.
Multi-Site Access: Enable users at different locations to access recordings from any recorder across distributed sites, provided network permissions allow connectivity between recorders.
By default, Centralized Archiving copies recordings as they occur from one recorder to another.
To prevent unintended loops where recordings continuously cycle between recorders, configure each drive to use the Archive only local recordings setting (See Section 7.5.2.1 Settings). This ensures only recordings originally recorded on the local system will get archived to the destination recorder.
For archiving to non-recorder destinations like NAS from ‘Recorder A’, leave the “Archive only local recordings” setting in the default off state on the NAS drive. This setup allows ‘Recorder A’ to send all recordings to the NAS independently, supporting multiple redundant archives.
Use Configuration Manager under Archiving –> Archive Configuration to adjust settings for each drive.
Note
Settings are configured individually for each drive, rather than applied globally across all drives.
These settings are also applicable to the standard archive configurations, but are particularly beneficial when utilized with Centralized Archiving.